

Everything you need for work, home and learning
Over 180 Stores
Click & Collect
Top Brands
Print & Copying
DHL Service Point
Western Union


NEW BLOGGER ALERT! Introducing new Ryman guest blogger, Jessica Amey, whose blog alongcamecherry.co.uk sees her tackling fun kids crafts and family life head on. Find out more about Jess at the end of this blog.
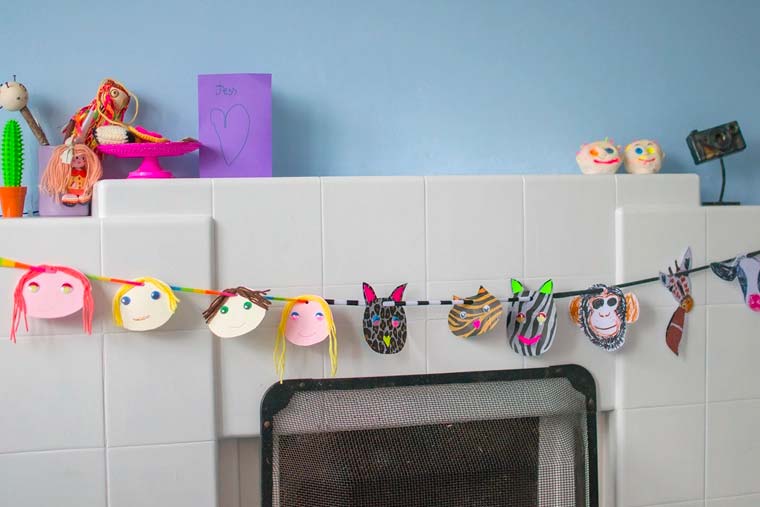
I love using card for crafting with the kids, as it’s so versatile and comes in lots of different colours. Today I wanted to show you how to make 3 different types of bunting using card. It’s a great activity for kids - my 6 year old absolutely loved making them. The great thing is that kids can customise this bunting in any way they like, ensuring that they’ve got something truly unique. It’s a great opportunity for them to get creative and if they’d really like to push the uniqueness of the bunting, why not encourage them to cut out letters spelling out their names?
NEW BLOGGER ALERT! Introducing new Ryman guest blogger, Jessica Amey, whose blog alongcamecherry.co.uk sees her tackling fun kids crafts and family life head on. Find out more about Jess at the end of this blog.
I love using card for crafting with the kids, as it’s so versatile and comes in lots of different colours. Today I wanted to show you how to make 3 different types of bunting using card. It’s a great activity for kids - my 6 year old absolutely loved making them. The great thing is that kids can customise this bunting in any way they like, ensuring that they’ve got something truly unique. It’s a great opportunity for them to get creative and if they’d really like to push the uniqueness of the bunting, why not encourage them to cut out letters spelling out their names?
The first type of bunting I’m going to show you is an illustrated animal bunting.
You will need:
Wool/String
We started by drawing our animal faces onto the white card. I found images of animals on the internet for us to work from, though a book would do just as well. For the lion we created a roarsome mane by gluing some yellow, orange and black wool around his face.

When we had drawn them we cut around the faces and at this point I laminated them. This step is optional so if you don’t have a laminator then it doesn’t matter. It’s just a good way to protect the drawings so they last longer.
The next step is to punch a hole through the tops of the animals using the hole punch and thread through some string. I actually used an old t-shirt cut into strips for my bunting, but string or wool will work equally well. Then, you just need to hang your animal faces along the string, leaving as much or as little space between each face as your bunting requires.

Our next crafty project is a smiley face bunting. These are super simple and fun to make. Your kids might like making self-portraits for this one too!
You will need:
Wool/String
First, start by cutting out a face shape from the coloured card.

Use your hole punch to punch a hole in the top of the face then glue on the googly eyes and cut out some wool in different colours to be glued on as hair. Use a pen to draw on a mouth and you have your smiley face.

Thread some string through the holes and you have yourself some smiley face bunting. I used t-shirt yarn for ‘string’ as it is a little thicker than standard string or wool, but any of these options will do nicely.
Then the last one is neon animal bunting. I let the kids decorate these however they liked.
You will need:
String/Wool

Start by gluing the animal print tissue paper onto the card then punch a hole in the top and glue on some googly eyes. Then you just need to cut shapes out of the neon card for the ears and mouth.

Now you have your exotic animal faces, use the hold punch to put holes between their ears, then thread some string through the tops of the animals and they’re ready to become bunting!

I hope you’ve enjoyed these simple ideas for fun crafts that you can do with the kids. They are really great for parties or just to add a fun decorative touch to bedrooms. There’s also plenty of room for further creativity, whether you want to try out letters to spell names, or even giving your smiley face bunting a wild touch by the addition of the safari tissue paper!
You can find loads of great products for fun and easy kids crafts on the Ryman Website

Jess lives on the south coast of England with her two children, Cherry and Tiger and her partner, Mr C. Her blog, Along Came Cherry is a family lifestyle blog that focusses on the likes of kids’ crafts, upcycling and beach life. Visit her blog here: Alongcamecherry